升級 Prisma ORM 層
總覽
本頁面說明升級流程的第一步:取得您的 Prisma 1 配置並將其升級到 Prisma ORM 2。具體來說,您將學習如何
- 新增 Prisma ORM 2 CLI 作為開發依賴項
- 建立您的 Prisma ORM 2 schema
- 確定您的連線 URL 並連線到您的資料庫
- 內省您的資料庫(到目前為止使用 Prisma 1 管理)
- 使用 Prisma 1 升級 CLI 來解決新 Prisma ORM 2 資料模型中的 schema 不相容性
- 安裝並產生 Prisma Client
完成這些步驟後,您可以繼續閱讀下一個指南,該指南說明如何升級應用程式層以使用 Prisma Client 進行資料庫查詢。
注意:在升級過程中,取得資料庫的圖形化檢視會很有幫助。因此,建議使用圖形化資料庫用戶端連線到您的資料庫,例如 TablePlus 或 Postico。
1. 安裝 Prisma ORM 2 CLI
Prisma ORM 2 CLI 以 npm 上的 prisma 套件形式提供,並透過 prisma 命令調用。
請注意,先前的 Prisma 1 prisma 命令已重新命名為 prisma1。您可以在此處了解更多資訊。
您可以依照以下步驟在您的 Node.js 專案中安裝 Prisma ORM 2 CLI(請務必在您的 package.json 所在的目錄中調用此命令)
npm install prisma --save-dev
注意:對於 Prisma 1,通常建議全域安裝 CLI。我們現在建議在本機安裝 Prisma CLI,以防止版本衝突。
您現在可以使用 npx 作為前綴來使用本機安裝的 prisma CLI
npx prisma
如果您要一次性升級整個專案,您現在也可以解除安裝 Prisma 1 CLI(否則請展開下方內容)
# remove global installation
npm uninstall -g prisma1

# remove local installation
npm uninstall prisma1
如果您想並排使用 Prisma 1 CLI,請展開
如果您想繼續使用 Prisma 1 CLI,建議移除它的全域安裝,並將 prisma1 CLI 新增為開發依賴項
# installs v1.34 of the Prisma 1 CLI
npm uninstall -g prisma
npm install prisma1 --save-dev
您現在可以依照以下步驟調用它
npx prisma1
請注意,如果您需要小於 1.34 的 CLI 版本(例如 1.30),您可以依照以下步驟安裝
# installs v1.30 of the Prisma 1 CLI
npm uninstall -g prisma@1.30
npm install prisma@1.30 --save-dev
您現在可以依照以下步驟調用它
npx prisma
2. 建立您的 Prisma ORM 2 schema
在本指南中,您將首先使用 prisma init 命令建立新的 Prisma schema,然後使用 內省「填入」資料模型。
執行以下命令以建立您的 Prisma schema(請注意,如果您已經有一個名為 prisma 的資料夾,則會拋出錯誤)
npx prisma init
如果您看到以下錯誤,您需要重新命名目前的 prisma 目錄
ERROR  A folder called prisma already exists in your project.
       Please try again in a project that is not yet using Prisma.
您可以將目前的 prisma 目錄重新命名為 prisma1,以清楚表明它包含先前的 Prisma 1 配置
mv prisma prisma1
現在您可以執行 init,它將會成功
npx prisma init
它應該列印以下輸出
✔ Your Prisma schema was created at prisma/schema.prisma.
  You can now open it in your favorite editor.

Next steps:
1. Set the `DATABASE_URL` in the `.env` file to point to your existing database. If your database has no tables yet, read https://pris.ly/d/getting-started
2. Set the `provider` of your `datasource` block in `schema.prisma` to match your database: `postgresql`, `mysql` or `sqlite`.
3. Run `prisma db pull` to turn your database schema into a Prisma data model.
4. Run `prisma generate` to install Prisma Client. You can then start querying your database.

More information in our documentation:
https://pris.ly/d/getting-started
該命令建立了一個名為 prisma 的新資料夾,以及兩個檔案
prisma/schema.prisma:您的 Prisma schema,指定了 資料來源、產生器 和 資料模型(請注意,資料模型尚不存在,它將透過內省產生)。.env:一個 dotenv 檔案,用於配置您的資料庫 連線 URL。
您的初始 Prisma schema 如下所示
// This is your Prisma schema file,
// learn more about it in the docs: https://pris.ly/d/prisma-schema

datasource db {
  provider = "mysql"
  url      = env("DATABASE_URL")
}

generator client {
  provider = "prisma-client-js"
}
使用 Prisma 1,您可以在 prisma.yml 中指定您想要使用的 Prisma Client 的語言變體。使用 Prisma ORM 2,此資訊現在在 Prisma schema 中透過 generator 區塊指定。
注意:與 Prisma 1 不同,Prisma Client 2.0 的 TypeScript 和 JavaScript 變體使用相同的產生器,稱為
prisma-client-js。index.d.ts中的產生類型總是包含在內,即使在純 JavaScript 專案中也是如此。即使不使用 TypeScript,這也能啟用 VS Code 中的自動完成等功能。
3. 確定您的連線 URL 並連線到您的資料庫
使用 Prisma 1,資料庫連線在用於啟動 Prisma ORM 伺服器的 Docker Compose 檔案中配置。然後,Prisma ORM 伺服器公開一個 GraphQL 端點(透過 HTTP),該端點代理來自 Prisma Client 應用程式程式碼的所有資料庫請求。該 HTTP 端點在您的 prisma.yml 中指定。
使用 Prisma ORM 2,HTTP 層不再公開,並且 Prisma Client 2.0 配置為「直接」對資料庫執行請求(也就是說,請求由 Prisma ORM 的 查詢引擎代理,但不再有額外的伺服器)。
因此,下一步您需要告訴 Prisma ORM 2 您使用哪種資料庫(MySQL 或 PostgreSQL)以及它位於何處。
首先,您需要確保 schema.prisma 內 datasource 區塊上的 provider 欄位配置為使用正確的資料庫
- 如果您使用 PostgreSQL,則需要在
provider欄位中定義值"postgresql"。 - 如果您使用 MySQL,則需要在
provider欄位中定義值"mysql"。
在程式碼區塊中使用標籤切換以查看兩者的範例
- PostgreSQL
- MySQL
datasource db {
  provider = "postgresql"
  url      = env("DATABASE_URL")
}
datasource db {
  provider = "mysql"
  url      = env("DATABASE_URL")
}
設定 provider 欄位後,您可以繼續在 .env 檔案中配置連線 URL。
假設您用於部署 Prisma ORM 伺服器的 Docker Compose 檔案中的資料庫配置如下所示
PRISMA_CONFIG: |
  port: 4466
  databases:
    default:
      connector: mysql
      host: mysql
      port: 3306
      user: root
      password: randompassword
也假設您的 prisma.yml 中的 endpoint 配置如下所示
endpoint: http://127.0.0.1:4466/myproject/dev
根據這些連線詳細資訊,您需要在 .env 檔案中配置 DATABASE_URL 環境變數,如下所示
DATABASE_URL="mysql://root:randompassword@localhost:3306/myproject@dev"
請注意,連線 URL 中的資料庫名稱通常由您的服務名稱和服務階段組成(它們是 prisma.yml 中 endpoint 的一部分),並以 @ 字元分隔。
有時在 prisma.yml 中未指定服務名稱和階段
endpoint: http://127.0.0.1:4466/
在這種情況下,資料庫名稱必須指定如下
DATABASE_URL="mysql://root:randompassword@localhost:3306/default@default"
在 連線 URL 頁面上了解更多資訊。
4. 內省您的資料庫
為了本指南的目的,我們將使用以下 Prisma 1 資料模型(選取下方的 SQL 標籤以查看資料模型在 SQL 中的對應方式)
- Prisma 1 資料模型
- SQL
type User {
  id: ID! @id
  email: String @unique
  name: String!
  role: Role! @default(value: CUSTOMER)
  jsonData: Json
  profile: Profile
  posts: [Post!]!
}

type Post {
  id: ID! @id
  createdAt: DateTime! @createdAt
  updatedAt: DateTime! @updatedAt
  title: String!
  content: String
  published: Boolean! @default(value: false)
  author: User @relation(link: TABLE)
  categories: [Category!]!
}

type Profile {
  id: ID! @id
  bio: String
  user: User! @relation(link: INLINE)
}

type Category {
  id: ID! @id
  name: String!
  posts: [Post!]!
}

enum Role {
  ADMIN
  CUSTOMER
}
CREATE TABLE"User" (
    id character varying(25) PRIMARY KEY,
    email text,
    name text NOT NULL,
    role text NOT NULL,
    "jsonData" text
);
CREATE UNIQUE INDEX "User_pkey" ON"User"(id text_ops);
CREATE UNIQUE INDEX "default$default.User.email._UNIQUE" ON"User"(email text_ops);

CREATE TABLE"Post" (
    id character varying(25) PRIMARY KEY,
    title text NOT NULL,
    published boolean NOT NULL,
    "createdAt" timestamp(3) without time zone NOT NULL,
    "updatedAt" timestamp(3) without time zone NOT NULL,
    content text
);
CREATE UNIQUE INDEX "Post_pkey" ON"Post"(id text_ops);

CREATE TABLE"Profile" (
    id character varying(25) PRIMARY KEY,
    bio text,
    user character varying(25) REFERENCES"User"(id) ON DELETE SET NULL
);
CREATE UNIQUE INDEX "Profile_pkey" ON"Profile"(id text_ops);

CREATE TABLE"Category" (
    id character varying(25) PRIMARY KEY,
    name text NOT NULL
);
CREATE UNIQUE INDEX "Category_pkey" ON"Category"(id text_ops);

CREATE TABLE"_PostToUser" (
    "A" character varying(25) NOT NULL REFERENCES"Post"(id) ON DELETE CASCADE,
    "B" character varying(25) NOT NULL REFERENCES"User"(id) ON DELETE CASCADE
);
CREATE UNIQUE INDEX "_PostToUser_AB_unique" ON"_PostToUser"("A" text_ops,"B" text_ops);
CREATE INDEX "_PostToUser_B" ON"_PostToUser"("B" text_ops);

CREATE TABLE"_CategoryToPost" (
    "A" character varying(25) NOT NULL REFERENCES"Category"(id) ON DELETE CASCADE,
    "B" character varying(25) NOT NULL REFERENCES"Post"(id) ON DELETE CASCADE
);
CREATE UNIQUE INDEX "_CategoryToPost_AB_unique" ON"_CategoryToPost"("A" text_ops,"B" text_ops);
CREATE INDEX "_CategoryToPost_B" ON"_CategoryToPost"("B" text_ops);
請注意,此資料模型具有三個關聯
- 1-1:
User↔Profile - 1-n:
User↔Post(透過_PostToUser關聯表維護) - m-n:
Post↔Category(透過_CategoryToPost關聯表維護)
現在您可以使用以下命令對您的資料庫執行 Prisma ORM 的內省
npx prisma db pull
以下是調用 db pull 時發生的情況的圖形說明
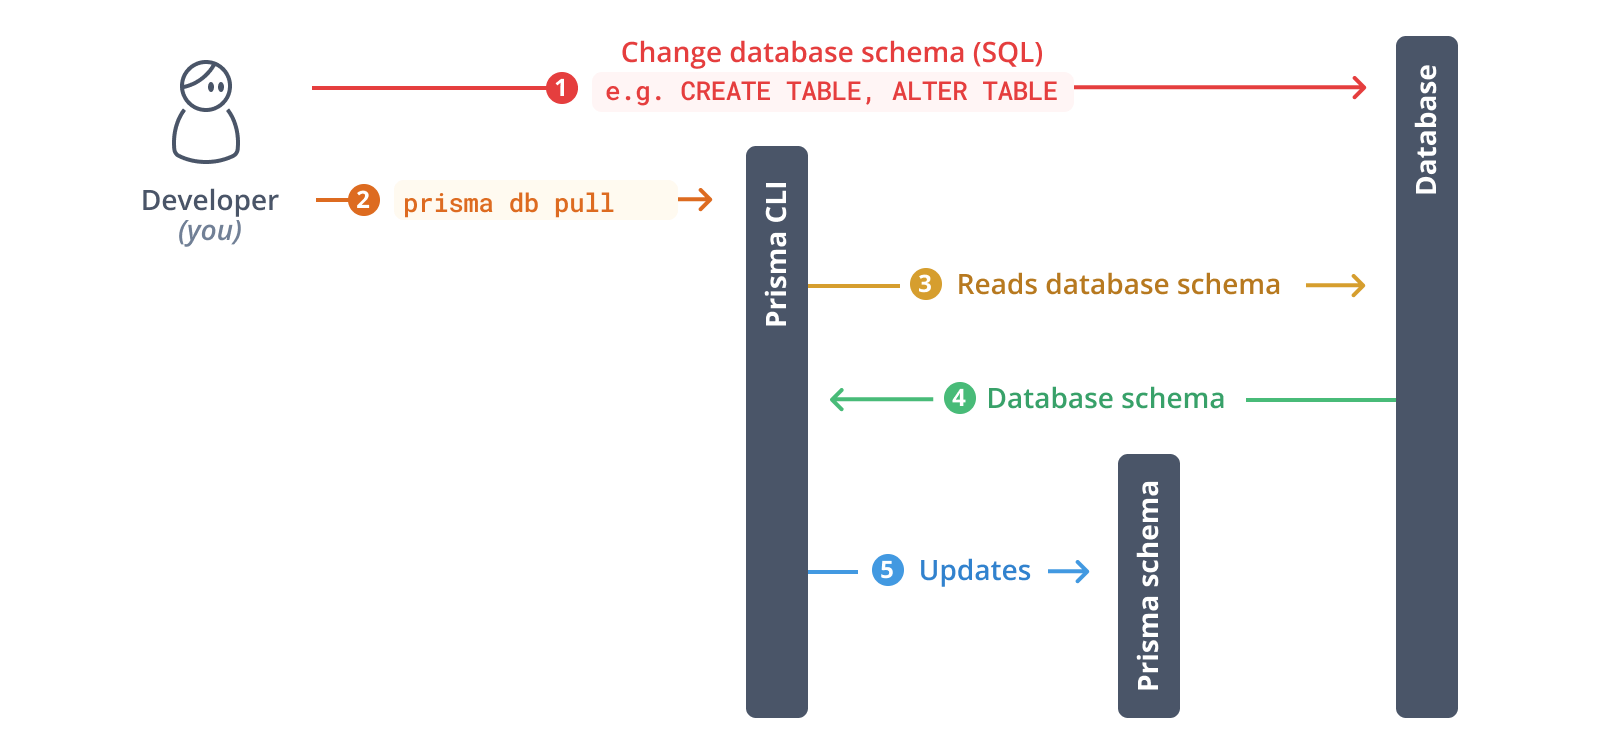
對於上述 Prisma 1 資料模型,這會產生以下 Prisma ORM 2 schema(請注意,模型已重新排序以符合 Prisma 1 資料模型的初始順序)
model User {
  id       String    @id @default(cuid())
  email    String?   @unique
  name     String
  role     String
  jsonData String?
  Profile  Profile[]
  Post     Post[]
}

model Post {
  id        String     @id @default(cuid())
  createdAt DateTime
  updatedAt DateTime
  title     String
  content   String?
  published Boolean
  Category  Category[]
  User      User[]
}

model Profile {
  id   String  @id @default(cuid())
  bio  String?
  user String? @unique
  User User?   @relation(fields: [user], references: [id])
}

model Category {
  id   String @id @default(cuid())
  name String
  Post Post[]
}
雖然這已經是有效的 Prisma ORM 2 schema,但它缺少許多功能,這些功能是其 Prisma 1 對等項的一部分
Post上createdAt和updatedAt欄位沒有自動產生的日期值User上role欄位沒有預設值Post上published欄位沒有預設值
此外,還有許多不一致之處,導致 Prisma Client API 不太符合慣例/不夠人體工學
User↔Profile是 1-n 關聯,而不是 1-1 關聯User↔Post是 m-n 關聯,而不是 1-n 關聯- 關聯欄位為大寫(例如
User上的Profile和Post) User上的jsonData欄位類型為String,而不是JsonUser上的role欄位類型為String,而不是Role,完全缺少 role 的enum定義
雖然這些不一致實際上不會影響您在 Prisma Client API 中可用的「功能集」,但它們會讓您失去以前存在的某些約束/保證。
例如,Prisma ORM 現在無法保證 User 最多連線到一個 Profile,因為表之間的關聯在內省期間被識別為 1-n,因此一個 User 記錄現在可以連線到多個 Profile 記錄。
另一個問題是,您可以為 jsonData 和 role 欄位儲存任何文字,而不管它是否為有效的 JSON 或表示 Role enum 的值。
若要深入了解這些不一致之處,請查看 Schema 不相容性 頁面。
在接下來的內容中,我們將逐步解決這些不相容性,並使用 Prisma schema 升級 CLI 逐一修復它們。
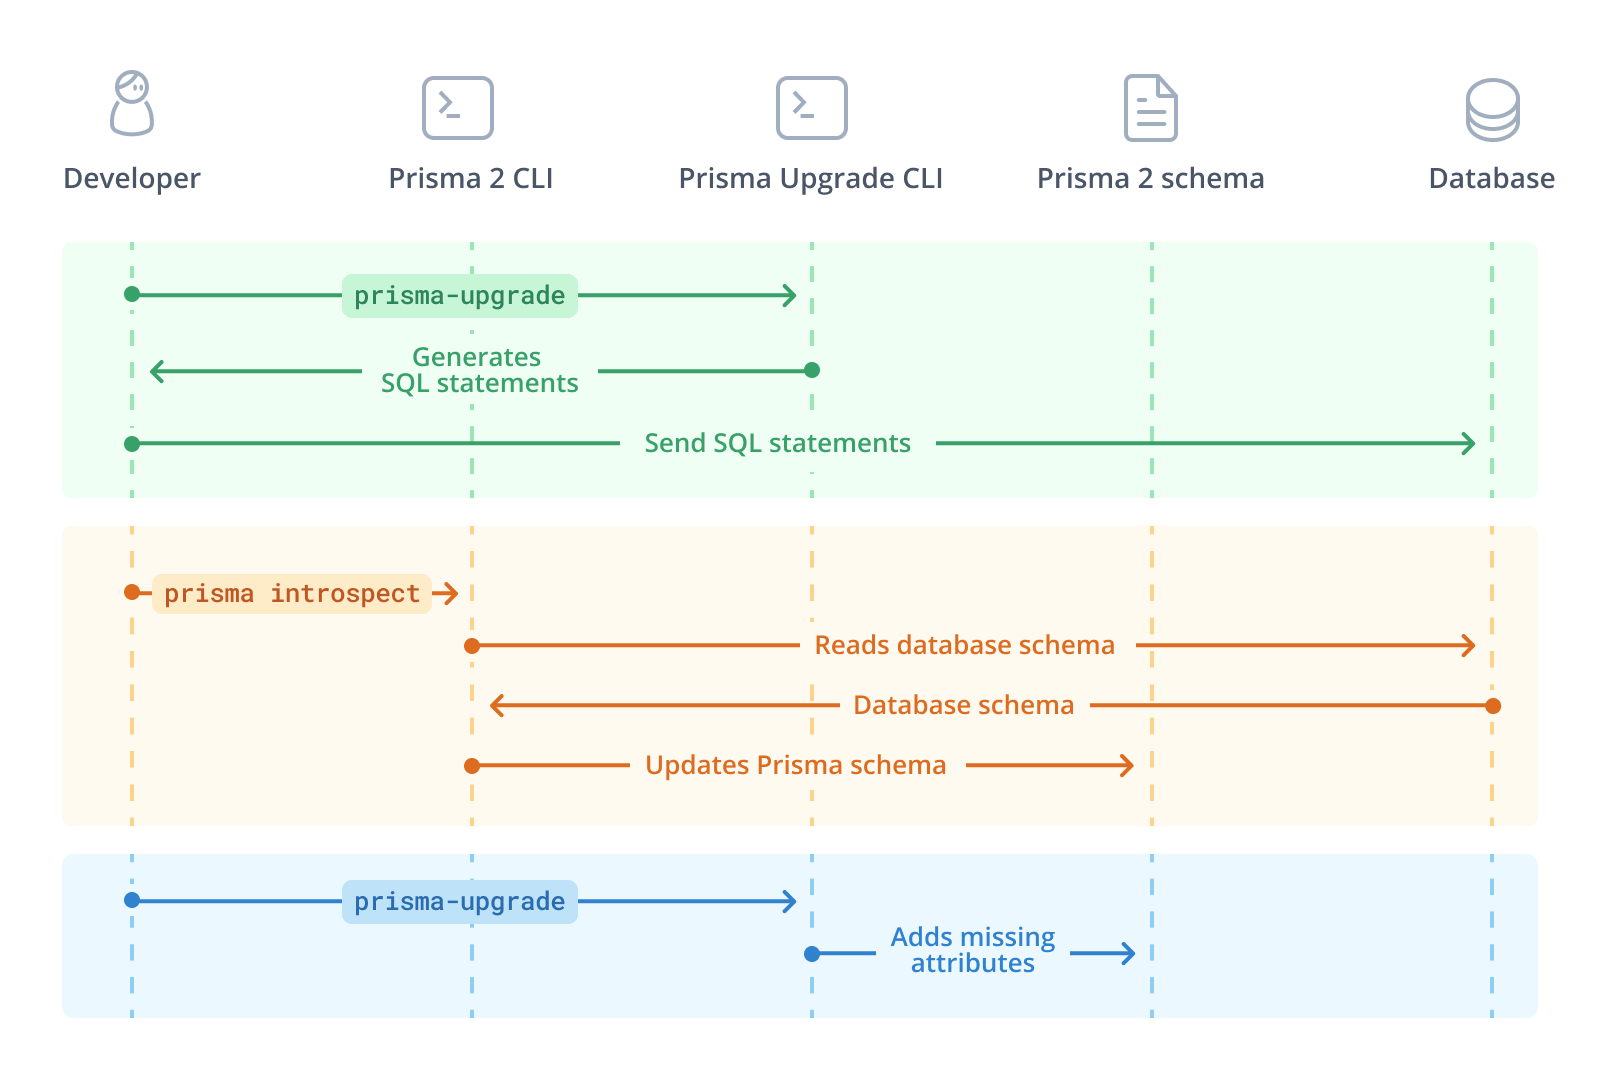
5. 使用 Prisma schema 升級 CLI 來解決 schema 不相容性
Prisma 1 升級 CLI 是一種互動式工具,可協助您升級 Prisma schema 並消除上面列出的大部分不一致之處。
Prisma 1 升級 CLI 分為兩個主要階段
- 透過純 SQL 修復資料庫 schema
- 將遺失的屬性新增至 Prisma ORM 2 schema 和其他 schema 修復
在第一階段,它將產生並列印許多 SQL 語句,您應該對資料庫執行這些語句以調整資料庫 schema。您可以執行所有語句或它們的子集,然後再繼續第二階段。
在第二階段,您不需要手動執行任何操作。升級 CLI 將透過新增某些 Prisma ORM 層級屬性(例如 @default(cuid)) 或 @updatedAt)、調整關聯欄位的名稱以符合 Prisma 1 資料模型中的名稱,以及確保 Prisma 1 資料模型中雙方都需要的 1-1 關聯在 Prisma ORM 2 schema 中也需要,來變更您的 Prisma schema。
請注意,您可以在流程中的任何時間重新開始,並從第二階段返回第一階段。
在此圖示中,綠色區域顯示第一階段,藍色區域顯示第二階段。請注意,您可以選擇在階段之間執行 prisma db pull 以更新您的 Prisma ORM 資料模型
若要使用升級 CLI,您可以將其在本機安裝到您的專案中,或使用 npx 調用它一次而無需安裝,如此處所示
npx prisma-upgrade prisma1/prisma.yml prisma/schema.prisma
CLI 將顯示以下訊息歡迎您
◮ Welcome to the interactive Prisma Upgrade CLI that helps with the
upgrade process from Prisma 1 to Prisma ORM 2.

Please read the docs to learn more about the upgrade process:
https://pris.ly/d/how-to-upgrade

➤ Goal
The Upgrade CLI helps you resolve the schema incompatibilities
between Prisma 1 and Prisma ORM 2. Learn more in the docs:
https://pris.ly/d/schema-incompatibilities

➤ How it works
Throughout the process, you'll need to adjust your database schema by sending
SQL statements to it. The SQL statements are provided by the Upgrade CLI.

Note that the Upgrade CLI never makes changes to your database,
you are in full control over any operations that are executed against it.

You can stop and re-run the Upgrade CLI at any time.

These are the different steps of the upgrade process:

  1. The Upgrade CLI generates SQL commands for you to run on your database.
  2. You run the SQL commands against your database.
  3. You run the `npx prisma db pull` command again.
  4. You run the `npx prisma-upgrade` command again.
  5. The Upgrade CLI adjusts the Prisma ORM 2 schema by adding missing attributes.

➤ Note
It is recommended that you make a full backup of your existing data before starting
the upgrade process. If possible, the migration should be performed in a staging
environment before executed against a production environment.

➤ Help
If you have any questions or run into any problems along the way,
please create an issue at:
https://github.com/prisma/prisma1-upgrade/issues/new

Are you ready? [Y/n]
按下 Y 按鈕,然後按下鍵盤上的 RETURN 以繼續。
確認後,CLI 會輸出您應該對資料庫執行的 SQL 語句
➤ Adjust your database schema
Run the following SQL statements against your database:

  Fix columns with ENUM data types
  https://pris.ly/d/schema-incompatibilities#enums-are-represented-as-text-in-database

    ALTER TABLE `User` CHANGE `role` `role` ENUM('ADMIN', 'CUSTOMER') NOT NULL;


  Add missing `DEFAULT` constraints to the database
  https://pris.ly/d/schema-incompatibilities#default-values-arent-represented-in-database

    ALTER TABLE `User` CHANGE `role` `role` ENUM('ADMIN', 'CUSTOMER') NOT NULL DEFAULT 'CUSTOMER';
    ALTER TABLE `Post` CHANGE `published` `published` TINYINT(1) NOT NULL DEFAULT 0;


  Fix columns with JSON data types
  https://pris.ly/d/schema-incompatibilities#json-type-is-represented-as-text-in-database

    ALTER TABLE `User` CHANGE `jsonData` `jsonData` JSON ;


  Replicate `@createdAt` behavior in Prisma ORM 2.0
  https://pris.ly/d/schema-incompatibilities#createdat-isnt-represented-in-database

    ALTER TABLE `Post` CHANGE `createdAt` `createdAt` DATETIME NOT NULL DEFAULT CURRENT_TIMESTAMP;


  Fix 1-1 relations by adding `UNIQUE` constraints
  https://pris.ly/d/schema-incompatibilities#inline-1-1-relations-are-recognized-as-1-n-missing-unique-constraint

    ALTER TABLE `Profile` ADD UNIQUE (`user`);


  Migrate IDs from varchar(25) to varchar(30)
  https://pris.ly/d/schema-incompatibilities#mismatching-cuid-length

    SET FOREIGN_KEY_CHECKS=0;
    ALTER TABLE `Category` CHANGE `id` `id` char(30) CHARACTER SET utf8 NOT NULL;
    ALTER TABLE `Post` CHANGE `id` `id` char(30) CHARACTER SET utf8 NOT NULL;
    ALTER TABLE `Profile` CHANGE `id` `id` char(30) CHARACTER SET utf8 NOT NULL;
    ALTER TABLE `Profile` CHANGE `user` `user` char(30) CHARACTER SET utf8 ;
    ALTER TABLE `User` CHANGE `id` `id` char(30) CHARACTER SET utf8 NOT NULL;
    SET FOREIGN_KEY_CHECKS=1;

➤ Breaking changes detected

In order to fully optimize your database schema, you'll need to run a few SQL
statements that can break your Prisma 1 setup. Note that these changes are optional
and if you are upgrading gradually and running Prisma 1 and Prisma ORM 2 side-by-side,
you should not perform these changes yet. Instead, you can perform them whenever
you are ready to completely remove Prisma 1 from your project.
If you are upgrading all at once, you can safely perform these changes now.

Learn more in the docs:
https://pris.ly/d/how-to-upgrade'
注意:如果您看到關於重大變更的註解,您可以暫時忽略它。我們稍後會討論它。
顯示的 SQL 語句分為許多「buckets」,所有這些語句都旨在解決特定的 schema 不相容性
- 修復具有 ENUM 資料類型的欄位
- 將遺失的
DEFAULT約束新增至資料庫 - 修復具有 JSON 資料類型的欄位
- 在 Prisma 2 中複製
@createdAt行為 - 透過新增
UNIQUE約束來修復 1-1 關聯
下一步,您可以開始將 SQL 語句傳送到您的資料庫。請注意,所有這些變更都是非破壞性的,您將能夠繼續將 Prisma 1 與 Prisma ORM 2 並排使用。
接下來的章節將分別介紹要傳送到資料庫的不同種類的 SQL 語句。
5.1. 透過純 SQL 修復資料庫 schema(非破壞性)
在本節中,我們將逐步瀏覽列印的 SQL 語句,並將它們逐一對資料庫執行。
5.1.1. 修復具有 ENUM 資料類型的欄位
該工具做的第一件事是協助您確保 Prisma 1 資料模型中的 enum 定義將在基礎資料庫中表示為實際的 ENUM 類型,現在它們表示為純字串(例如,在 MySQL 中為 MEDIUMTEXT)。
CLI 目前顯示以下輸出
Fix columns with ENUM data types
https://pris.ly/d/schema-incompatibilities#enums-are-represented-as-text-in-database

  ALTER TABLE `User` CHANGE `role` `role` ENUM('ADMIN', 'CUSTOMER') NOT NULL;
繼續並立即對您的資料庫執行這些語句。
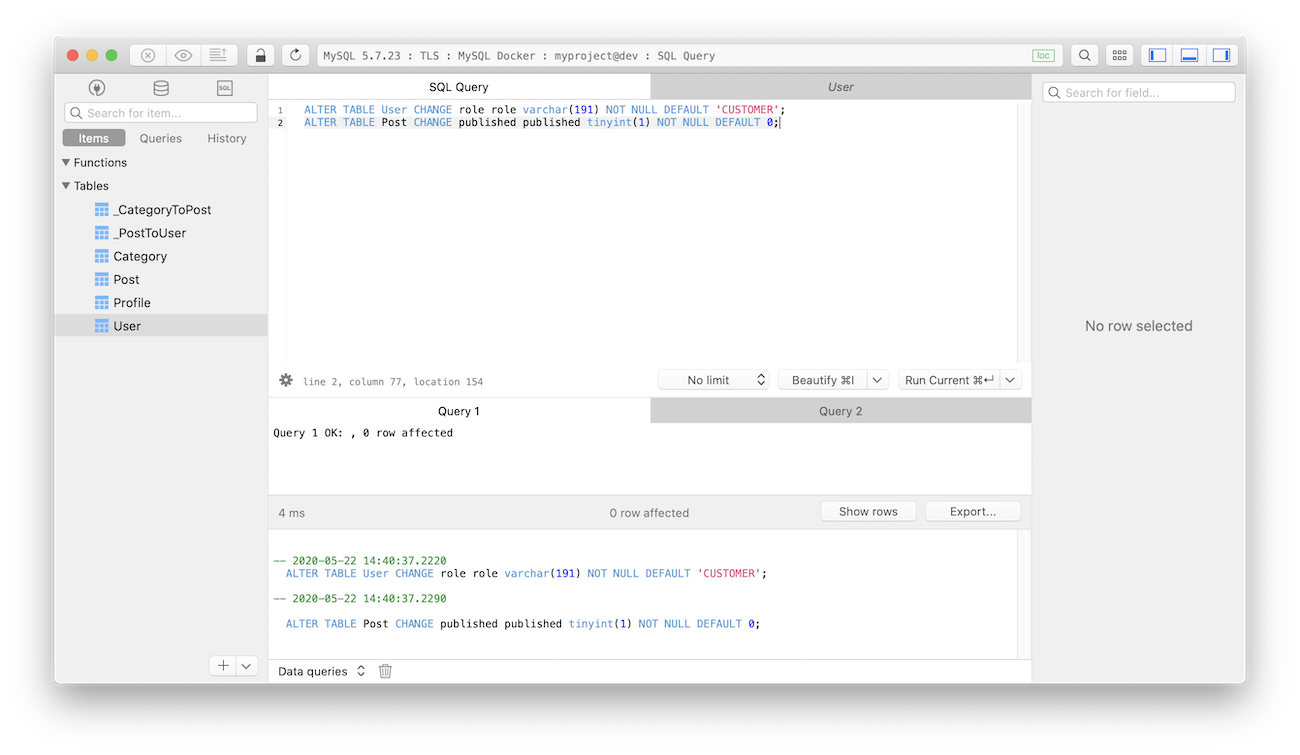
5.1.2. 將遺失的 DEFAULT 約束新增至資料庫
接下來,升級 CLI 協助您解決 預設值未在資料庫中表示 的問題,方法是產生 SQL 語句,將各自的 DEFAULT 約束直接新增至資料庫。
在這種情況下,遺失了兩個 DEFAULT 約束,這些約束由工具建議
Add missing `DEFAULT` constraints to the database
https://pris.ly/d/schema-incompatibilities#default-values-arent-represented-in-database

  ALTER TABLE `User` CHANGE `role` `role` ENUM('ADMIN', 'CUSTOMER') NOT NULL DEFAULT 'CUSTOMER';
  ALTER TABLE `Post` CHANGE `published` `published` TINYINT(1) NOT NULL DEFAULT 0;
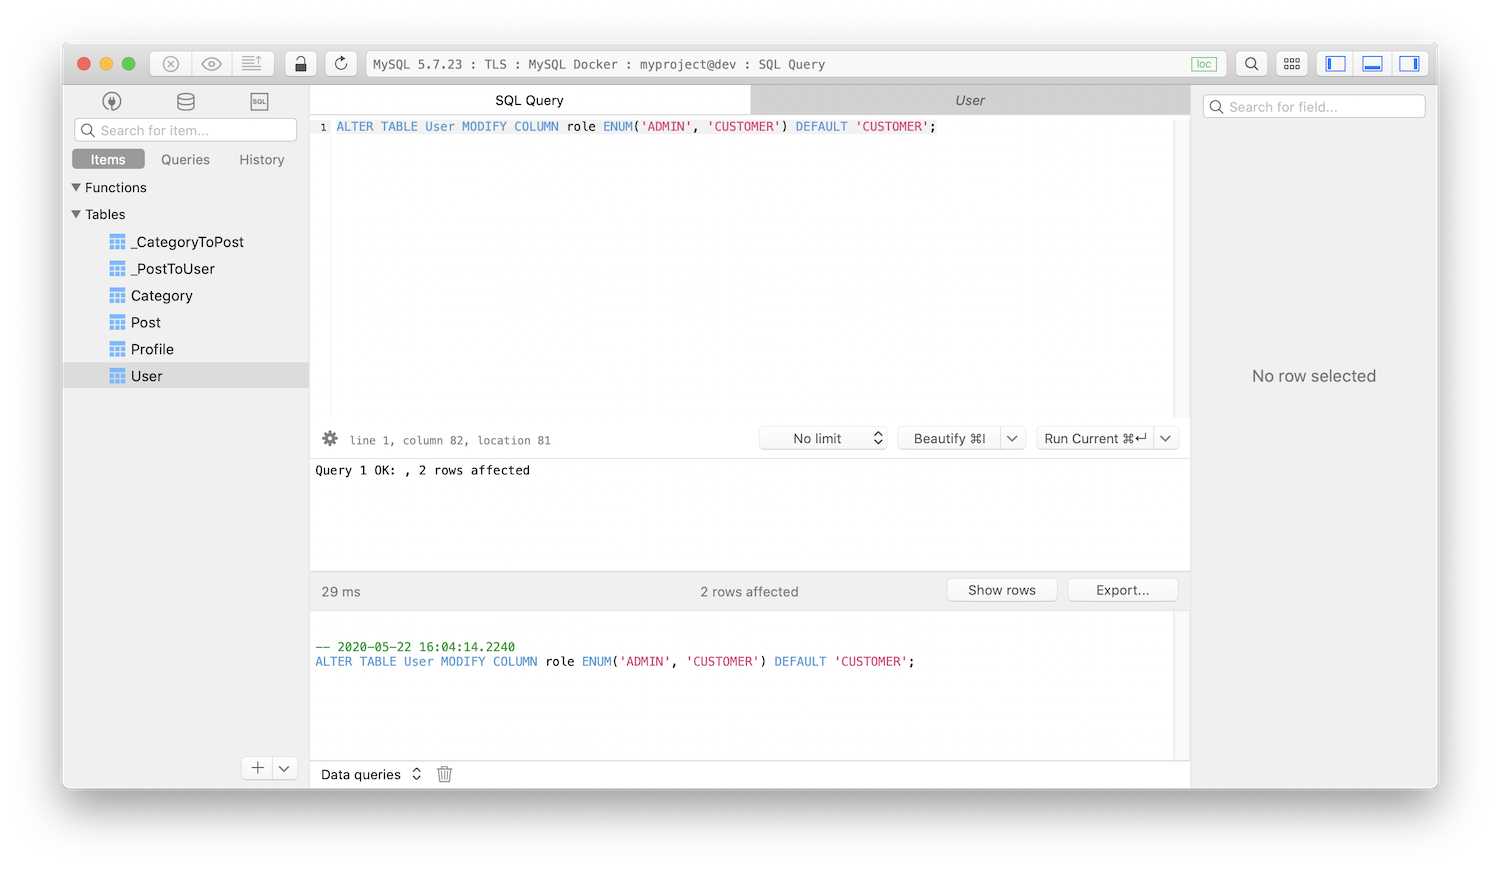
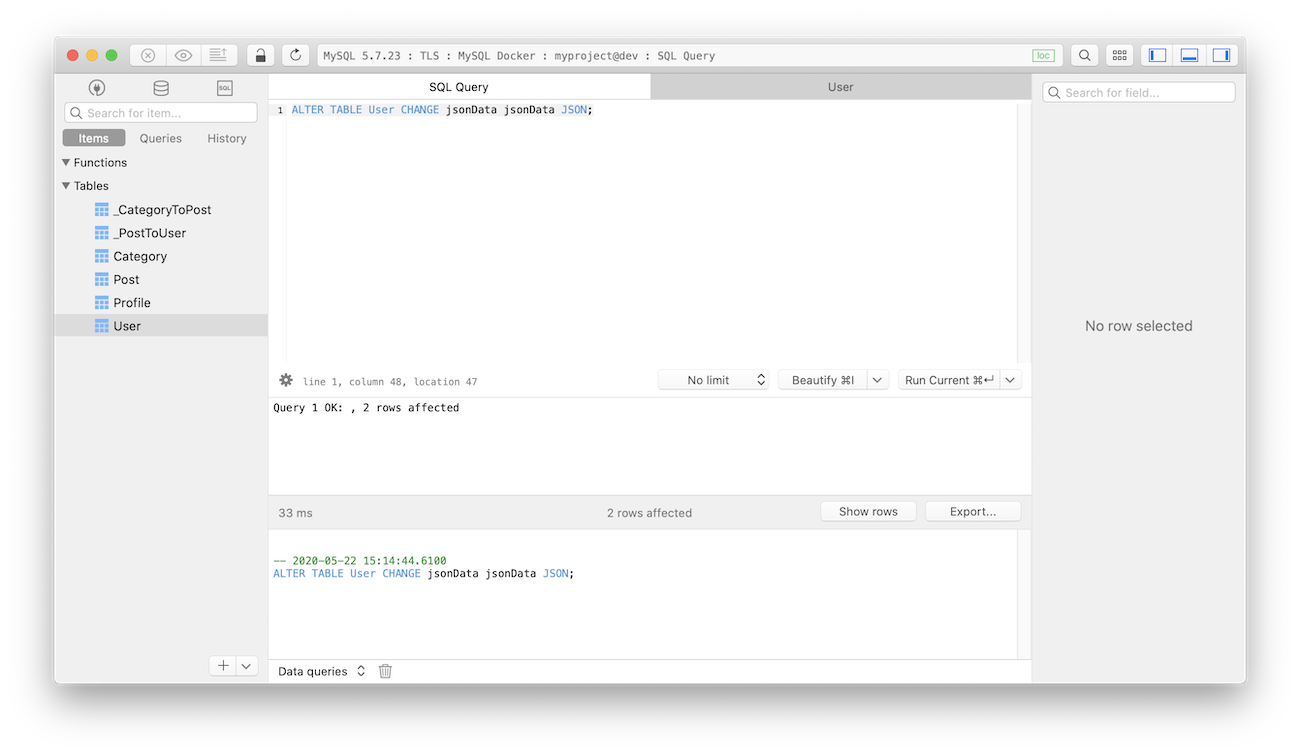
您現在可以使用命令列用戶端或 GUI(例如 TablePlus)對您的資料庫執行這些 SQL 語句
5.1.3. 修復具有 JSON 資料類型的欄位
接下來,該工具協助您確保 Prisma 1 資料模型中的 Json 欄位將在基礎資料庫中表示為 JSON 欄位,現在它們表示為純字串(例如,在 MySQL 中為 MEDIUMTEXT)。
將欄位類型變更為 JSON 將確保在 Prisma ORM 2 內省期間正確識別欄位為 Json。
CLI 目前顯示以下輸出
Fix columns with JSON data types
https://pris.ly/d/schema-incompatibilities#json-type-is-represented-as-text-in-database

  ALTER TABLE `User` CHANGE `jsonData` `jsonData` JSON ;
您現在可以使用命令列用戶端或 GUI(例如 TablePlus)對您的資料庫執行這些 SQL 語句
5.1.4. 在 Prisma ORM 2 中複製 @createdAt 行為
該工具接下來要做的就是協助您解決 @createdAt 行為未在資料庫中表示 的問題
CLI 目前顯示以下輸出
Replicate `@createdAt` behavior in Prisma ORM 2.0
https://pris.ly/d/schema-incompatibilities#createdat-isnt-represented-in-database

  ALTER TABLE `Post` CHANGE `createdAt` `createdAt` DATETIME NOT NULL DEFAULT CURRENT_TIMESTAMP;
您現在可以使用命令列用戶端或 GUI(例如 TablePlus)對您的資料庫執行這些 SQL 語句。
5.1.5. 透過新增 UNIQUE 約束來修復 1-1 關聯
現在,該工具將協助您將 User ↔ Profile 之間目前的 1-n 關聯變回 1-1 關聯,方法是在資料庫中名為 user 的外鍵欄位(以 Prisma 1 資料模型中的關聯欄位命名)新增 UNIQUE 約束。
CLI 目前顯示以下輸出
Fix 1-1 relations by adding `UNIQUE` constraints
https://pris.ly/d/schema-incompatibilities#inline-1-1-relations-are-recognized-as-1-n-missing-unique-constraint

  ALTER TABLE `Profile` ADD UNIQUE (`user`);
您現在可以使用命令列用戶端或 GUI(例如 TablePlus)對您的資料庫執行這些 SQL 語句。
5.1.6. 修復 CUID 長度不符
注意:即使在您變更基礎資料庫中的欄位類型後,這些 SQL 語句仍會繼續出現在升級 CLI 中。這是目前升級 CLI 中的限制。
最後,該工具將協助您將目前類型為 VARCHAR(25) 的 ID 欄位變更為 VARCHAR(30),方法是在資料庫中名為 user 的外鍵欄位(以 Prisma 1 資料模型中的關聯欄位命名)新增 UNIQUE 約束。
CLI 目前顯示以下輸出
Migrate IDs from varchar(25) to varchar(30)
https://pris.ly/d/schema-incompatibilities#mismatching-cuid-length

SET FOREIGN_KEY_CHECKS=0;
ALTER TABLE `Category` CHANGE `id` `id` char(30) CHARACTER SET utf8 NOT NULL;
ALTER TABLE `Post` CHANGE `id` `id` char(30) CHARACTER SET utf8 NOT NULL;
ALTER TABLE `Profile` CHANGE `id` `id` char(30) CHARACTER SET utf8 NOT NULL;
ALTER TABLE `Profile` CHANGE `user` `user` char(30) CHARACTER SET utf8 ;
ALTER TABLE `User` CHANGE `id` `id` char(30) CHARACTER SET utf8 NOT NULL;
SET FOREIGN_KEY_CHECKS=1;
您現在可以使用命令列用戶端或 GUI(例如 TablePlus)對您的資料庫執行這些 SQL 語句。
5.1.7. 偵測到重大變更
如果升級 CLI 列印了關於重大變更的註解,則您的資料庫 schema 需要進行一些調整,這些調整會破壞 Prisma 1 相容性,以便完全最佳化。
如果未偵測到重大變更,您可以跳到第 5.2 節
根據您的升級策略,您可以立即執行這些變更,或跳到升級 CLI 的下一個階段
- 如果您遵循漸進式並排升級策略,請勿立即執行這些變更,因為它們會破壞您的 Prisma 1 設定。在這種情況下,您可以繼續升級 CLI 的下一個階段,方法是輸入 n 並按下 RETURN。
- 如果您遵循一次性升級策略,您可以立即執行這些變更。在這種情況下,請繼續輸入 Y 並按下 RETURN。
5.2. 透過純 SQL 修復資料庫 schema(破壞性)
在本節中,您將解決破壞 Prisma 1 設定的 schema 不相容性。如果您仍在專案中執行 Prisma 1,請勿執行這些變更!
5.2.1. 修復不正確的 m-n 關聯
現在,升級 CLI 協助您修復 Prisma 1 使用關聯表表示的所有 1-1 和 1-n 關聯,以及 目前僅作為 m-n 關聯存在 在您的新 Prisma ORM 2 schema 中。具體來說,User ↔ Post 關聯就是這種情況,目前定義為 m-n,但實際上應該是 1-n 關聯。
若要修復此問題,您需要執行以下遷移
- 在
Post上建立新的外鍵欄位,以直接連結到User表。 - 將外鍵值從關聯表遷移到
Post上的新外鍵欄位。 - 刪除關聯表。
這些指示現在由 CLI 列印
➤ Adjust your database schema
Run the following SQL statements against your database:

  Fix one-to-many table relations
  https://pris.ly/d/schema-incompatibilities#all-non-inline-relations-are-recognized-as-m-n

    ALTER TABLE `Post` ADD COLUMN `authorId` char(25) CHARACTER SET utf8 ;
    ALTER TABLE `Post` ADD CONSTRAINT author FOREIGN KEY (`authorId`) REFERENCES `User`(`id`);
    UPDATE `Post`, `_PostToUser` SET `Post`.`authorId` = `_PostToUser`.B where `_PostToUser`.A = `Post`.`id`;
    DROP TABLE `_PostToUser`;


➤ Next Steps

After you executed one or more of the above SQL statements against your database,
please run the following two commands to refresh your Prisma ORM 2 Schema and check
the changes.

  1. Run `npx prisma db pull` again to refresh your Prisma ORM 2 schema.
  2. Run `npx prisma-upgrade` again.

If you can't or don't want to execute the remaining SQL statements right now, you can
skip to the last step where the Upgrade CLI adds missing attributes to your Prisma ORM 2
schema that are not picked up by introspection.

Skip to the last step? [Y/n]?
對於此修復,您需要執行三個 SQL 語句
- 在
Post表上建立新的欄位authorId。此欄位應為外鍵,參考User表的id欄位ALTER TABLE `Post` ADD COLUMN `authorId` char(25) CHARACTER SET utf8 ;
ALTER TABLE `Post` ADD CONSTRAINT author FOREIGN KEY (`authorId`) REFERENCES `User`(`id`); - 編寫一個 SQL 查詢,從
_PostToUser關聯表中讀取所有列,並針對每一列- 透過查詢欄位
A中的值來尋找各自的Post記錄 - 將欄位
B中的值作為authorId的值插入到該Post記錄中
UPDATE `Post`, `_PostToUser` SET `Post`.`authorId` = `_PostToUser`.B where `_PostToUser`.A = `Post`.`id`; - 透過查詢欄位
- 刪除
_PostToUser關聯表DROP TABLE `_PostToUser`;
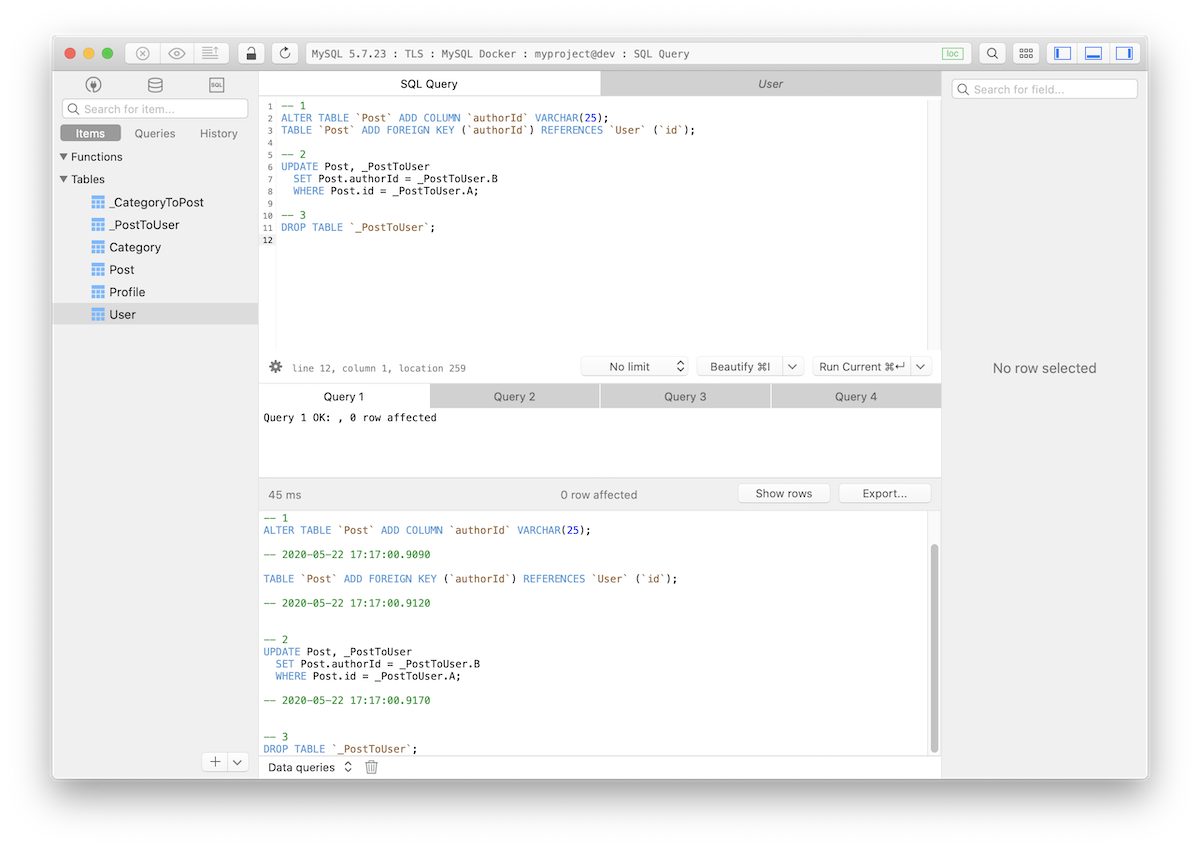
在這些命令之後,關聯表欄位 B 中的記錄的使用者 ID 值將遷移到新的 authorId 欄位。
5.2. 重新內省您的資料庫以更新您的 Prisma schema
此時,您已使用升級 CLI 解決了 schema 不相容性。您現在可以輸入 n 並按下 RETURN 以暫時退出升級 CLI。
在本節中,您將使用另一個內省回合更新您的 Prisma schema。這次,Prisma schema 的先前缺陷將得到解決,因為資料庫 schema 已調整
npx prisma db pull
這次,產生的 Prisma schema 如下所示
model User {
  id       String   @id
  name     String
  email    String?  @unique
  jsonData Json?
  role     Role     @default(CUSTOMER)
  Post     Post[]
  Profile  Profile?
}

model Post {
  id        String     @id
  createdAt DateTime   @default(now())
  updatedAt DateTime
  title     String
  content   String?
  published Boolean    @default(false)
  authorId  String?
  User      User?      @relation(fields: [authorId], references: [id])
  Category  Category[] @relation(references: [id])
}

model Category {
  id   String @id
  name String
  Post Post[] @relation(references: [id])
}

model Profile {
  bio  String?
  id   String  @id
  user String? @unique
  User User?   @relation(fields: [user], references: [id])
}

enum Role {
  ADMIN
  CUSTOMER
}
此 schema 大部分問題已解決,但仍缺少以下內容
5.2. 將遺失的屬性新增至 Prisma 2 schema 和其他 schema 修復
CLI 現在列印以下內容
➤ What happens next
As a last step, some final adjustments will be made to your Prisma ORM 2 schema
to carry over some Prisma ORM-level attributes that aren't picked up by introspection.

As a last step, some final adjustments will be made to your Prisma ORM 2.0
schema to carry over some Prisma ORM-level attributes that aren't picked
up by introspection.

Warning
Your current Prisma ORM 2.0 schema will be overwritten, so please
make sure you have a backup!

Are you ready? [Y/n]
此時,您要么執行了 CLI 列印的所有 SQL 語句,要么跳過了一些語句。無論哪種方式,您現在都可以繼續最後一步,讓升級 CLI 新增遺失的 Prisma ORM 2 屬性。通常這些是以下內容
@default(cuid())用於您的@id欄位@updatedAt用於任何在 Prisma 1 中使用此屬性的欄位@map和@@map作為 Prisma 1 中@db和@@db的替代品
在該步驟中,升級 CLI 還修復了過渡到 Prisma ORM 2 中發生的其他問題
- 它確保 Prisma 1 中雙方都需要的 1-1 關聯在您的 Prisma ORM 2 schema 中也需要
- 它將關聯欄位重新命名為與 Prisma 1 資料模型中相同的名稱 (即將推出)
若要套用這些變更,您可以重新執行升級 CLI
npx prisma-upgrade prisma1/prisma.yml prisma/schema.prisma
如果您未解決所有 schema 不相容性,升級 CLI 現在會列印剩餘的 SQL 語句(以及用於遷移 ID 的語句)。此時您可以忽略它們,並透過在提示時持續輸入 Y 並按下 RETURN 來繼續最後一步。
如果您確實解決了所有 schema 不相容性,則不會列印 SQL 語句,並且升級 CLI 只會輸出以下內容
$ npx prisma-upgrade prisma1/prisma.yml prisma/schema.prisma

➤ Next Steps

After you executed one or more of the previous SQL statements against your database,
please run the following two commands to refresh your Prisma ORM 2 schema and check
the changes.

  1. Run `npx prisma db pull` again to refresh your Prisma ORM 2 schema.
  2. Run `npx prisma-upgrade` again.

If you can't or don't want to execute the remaining SQL statements right now, you can
skip to the last step where the Upgrade CLI adds missing attributes to your Prisma ORM 2
schema that are not picked up by introspection.

Skip to the last step? [Y/n]?
再次輸入 Y 並按下 RETURN 以確認。
升級 CLI 的最後一個提示現在要求您確認它將對您的 Prisma schema 進行的上述變更
➤ What happens next
As a last step, some final adjustments will be made to your Prisma ORM 2 schema
to carry over some Prisma ORM-level attributes that aren't picked up by introspection.

As a last step, some final adjustments will be made to your Prisma ORM 2.0
schema to carry over some Prisma ORM-level attributes that aren't picked
up by introspection.

Warning
Your current Prisma ORM 2.0 schema will be overwritten, so please
make sure you have a backup!

Are you ready? [Y/n]
最後一次,輸入 Y 並按下 RETURN 以確認。
這是升級 CLI 的最終輸出
Updating prisma/schema.prisma...
Done updating prisma/schema.prisma!

✔ Congratulations, you're all set!

➤ Note
If you didn't execute all generated SQL commands against your database,
you can re-run the Upgrade CLI at any time.

Note that the Upgrade CLI doesn't resolve all of the schema incompatibilities
between Prisma 1 and Prisma ORM 2. If you want to resolve the remaining ones,
you can do so manually by following this guide:
https://pris.ly/d/upgrading-the-prisma-layer

➤ Next steps
Otherwise you can continue your upgrade process by installing Prisma Client 2:
npm install @prisma/client

You can find guides for different upgrade scenarios in the docs:
https://pris.ly/d/upgrade-from-prisma-1
5.3. 最終結果
Prisma schema 的最終版本應如下所示
model User {
  id       String   @id @default(cuid())
  name     String
  email    String?  @unique
  jsonData Json?
  role     Role     @default(CUSTOMER)
  Post     Post[]
  Profile  Profile?
}

model Post {
  id        String     @id @default(cuid())
  createdAt DateTime   @default(now())
  updatedAt DateTime   @updatedAt
  title     String
  content   String?
  published Boolean    @default(false)
  authorId  String?
  User      User?      @relation(fields: [authorId], references: [id])
  Category  Category[] @relation(references: [id])
}

model Profile {
  id   String  @id @default(cuid())
  bio  String?
  user String? @unique
  User User?   @relation(fields: [user], references: [id])
}

model Category {
  id   String @id @default(cuid())
  name String
  Post Post[] @relation(references: [id])
}

enum Role {
  ADMIN
  CUSTOMER
}
5.4. 重新命名關聯欄位
您會注意到此版本的 Prisma ORM 2 schema 的一件事是,所有關聯欄位都以其各自的模型命名,例如
model User {
  Post    Post[]
  Profile Profile?
}

model Post {
  User     User?      @relation(fields: [authorId], references: [id])
  Category Category[] @relation(references: [id])
}

model Profile {
  User User? @relation(fields: [user], references: [id])
}

model Category {
  Post Post[] @relation(references: [id])
}
這並不理想,實際上您可以手動將它們全部重新命名為之前的版本!
由於所有關聯欄位都是虛擬的,表示它們不會在資料庫中顯現,因此您可以隨意命名它們。在這種情況下,所有關聯欄位都是小寫,有時會是複數。
以下是重新命名後它們的外觀
model User {
  posts   Post[]
  profile Profile?
}

model Post {
  author     User?      @relation(fields: [authorId], references: [id])
  categories Category[] @relation(references: [id])
}

model Profile {
  user  String? @unique
  owner User?   @relation(fields: [user], references: [id])
}

model Category {
  posts Post[] @relation(references: [id])
}
注意:對於
User和Profile之間的 1-1 關聯,無法為關聯欄位設定舊名稱user。這是因為與已經存在的關聯純量欄位(保存外鍵)會發生命名衝突。在這種情況下,您可以選擇其他名稱,或者選擇直接透過 SQL 在資料庫中重新命名外鍵欄位。
5.5. 解決剩餘的 schema 不相容性
升級 CLI 尚未解決一些 schema 不相容性。此時,您仍然沒有修復純量列表。您可以在 Schema 不相容性 頁面上找到針對此問題和其他問題的建議解決方案。
6. 安裝並產生 Prisma Client
現在您已準備好 Prisma ORM 2 schema,您可以使用以下命令安裝 Prisma Client
npm install @prisma/client
7. 後續步驟
恭喜您,您現在已將 Prisma ORM 層升級到 Prisma ORM 2!從此開始,您可以繼續使用以下指南之一更新您的應用程式程式碼
- 舊版到新版 Nexus:如果您目前正在使用 Prisma 1 和 GraphQL Nexus,請選擇本指南。
- prisma-binding to Nexus:如果您目前使用 Prisma 1 和
prisma-binding,並想要升級到 Nexus (以及 TypeScript),請選擇此指南。 - prisma-binding to SDL-first:如果您目前使用 Prisma 1 和
prisma-binding,並想要升級到 SDL-first GraphQL 伺服器,請選擇此指南。 - REST API:如果您目前使用 Prisma 1 和 Prisma Client 1 並正在建構 REST API,請選擇此指南。
額外資訊:Prisma Client API 比較
本節包含 Prisma 1 和 Prisma ORM 2 的 Prisma Client API 的高階並排比較。有關新 Prisma Client API 的更多詳細資訊,您可以瀏覽 Prisma Client 文件。
讀取單筆記錄
const user = await prisma.user({ id: 1 })
await prisma.user.findUnique({
  where: { id: 1 },
})
讀取記錄列表
const user = await prisma.users()
await prisma.user.findMany()
篩選列表
const users = await prisma.users({
  where: {
    name: 'Alice',
  },
})
await prisma.user.findMany({
  where: {
    name: 'Alice',
  },
})
列表分頁
const posts = await prisma.posts({
  skip: 5,
  first: 10,
})
await prisma.user.findMany({
  skip: 5,
  take: 10,
})
列表排序
await prisma.posts({
  orderBy: 'title_ASC',
})
await prisma.posts({
  orderBy: {
    title: 'asc',
  },
})
建立記錄
await prisma.createUser({
  name: 'Alice',
})
await prisma.user.create({
  data: {
    name: 'Alice',
  },
})
更新記錄
await prisma.updateUser({
  where: { id: 1 },
  data: {
    name: 'James',
    email: 'james@prisma.io',
  },
})
await prisma.user.update({
  where: { id: 1 },
  data: {
    name: 'James',
    email: 'james@prisma.io',
  },
})
刪除記錄
await prisma.deleteUser({ id: 1 })
await prisma.user.delete({
  where: { id: 1 },
})
選取欄位 & 載入關聯
在 Prisma 1 中,選取特定欄位和/或載入物件關聯的唯一方法是使用基於字串的 $fragment 和 $graphql 函數。使用 Prisma ORM 2,現在可以使用 select 和 include 以清晰且型別安全的方式完成。
這種方法的另一個優點是,您可以在任何 Prisma Client 查詢中使用 select 和 include,例如 findUnique、findMany、create、update、delete 等。
await prisma.user({ id: 1 }).$fragment(`
  fragment NameAndEmail on User { id email }`
`)
await prisma.user.findUnique({
  where: { id: 1 },
  select: {
    id: true,
    email: true,
  },
})
舉例來說,在 Prisma 1 中,建立新記錄並僅檢索傳回物件中的 id 是不可能的。使用 Prisma ORM 2,您可以透過以下方式實現這一點
await prisma.user.create({
  data: {
    name: 'Alice',
  },
  select: {
    id: true,
  },
})